Tuesday, September 28, 2010

D.I.Y Ombre Hair.

Unless you've been living under a rock throughout summer (which seems to have swiftly departed) then you will know that "Ombre" hair has been a very "in" style. In very basic terms, it's a look of which it appears your hair has been sunkissed (depending on the strength of the colour) at the ends of your hair. Or that you're hair has grown out, leaving you with darker roots and lighter tips. It appears that the popular choice of colouring is brown to blonde/caramel, although i have seen people doing ombre with many different colours.


All images taken from Google. How hot does Drew Barrymore look right now?

A few months ago, i became very bored of my current hairstyle. I know a lot of you are always bigging up my long, brunette locks, but when you've had the same style for years, it does become a little mundane. I wanted something different, but i didnt know what. For a while i though of chopping it all off Frankie Sandford style, then i decided i would almost definitely miss my long hair. Then i thought of going all over caramel but i wasnt sure if i would suit it. It was then that i discovered "Ombre". I had saved various different images of celebrities sporting the ombre hairdo, in the hope that maybe, if i was feeling brave enough, i could take along a few photos to the hairdresser (who i was assuming would charge a stupid amount of moolah to essentially put some bleach and tin foil at the ends of my hair) After stumbling upon Lily's Blog LLYMLRS (which is amazing so go follow her) and finding her post on "How to DIY Ombre", i thought "This actually doesn't look all that difficult".

I pondered on the idea for a few weeks, went out and bought the dye & kept it until i felt brave enough. Saturday night, i thought "eck, why not", so i mixed the dye and tried out a strand test to see what the colour would be like after 25 minutes. If it was too blonde, it wouldnt have mattered as it was only one piece of hair. After 25 minutes, the colour wasnt really all that different. So, i knew it had to be on for longer.


L'oreal Perfect Blonde Highlighting Kit - £5.99 & HELLO BOOBIES.

I applied the dye all over the ends of my hair, making sure i really covered it all. I also put some on the ends of the hair that was closer to my face, as i wanted it to blend and feather a little more. I left that, for approximately 30 minutes. As there was a lot more dye, i think it worked a little quicker than the strand test. After this time, I washed and dried my hair, only to decide it wasn't quite as blonde as i'd hoped. It was more a dull gingery strawberry blonde, and i wanted a little more depth. So i then applied a bit more bleach but this time only to the very ends of my hair, i then put tin foil around it. I did this as i was getting ready to go out, and i didnt want bleach flicking everywhere, although i really think it helped the bleaching process along. I left this for another 20 minutes.


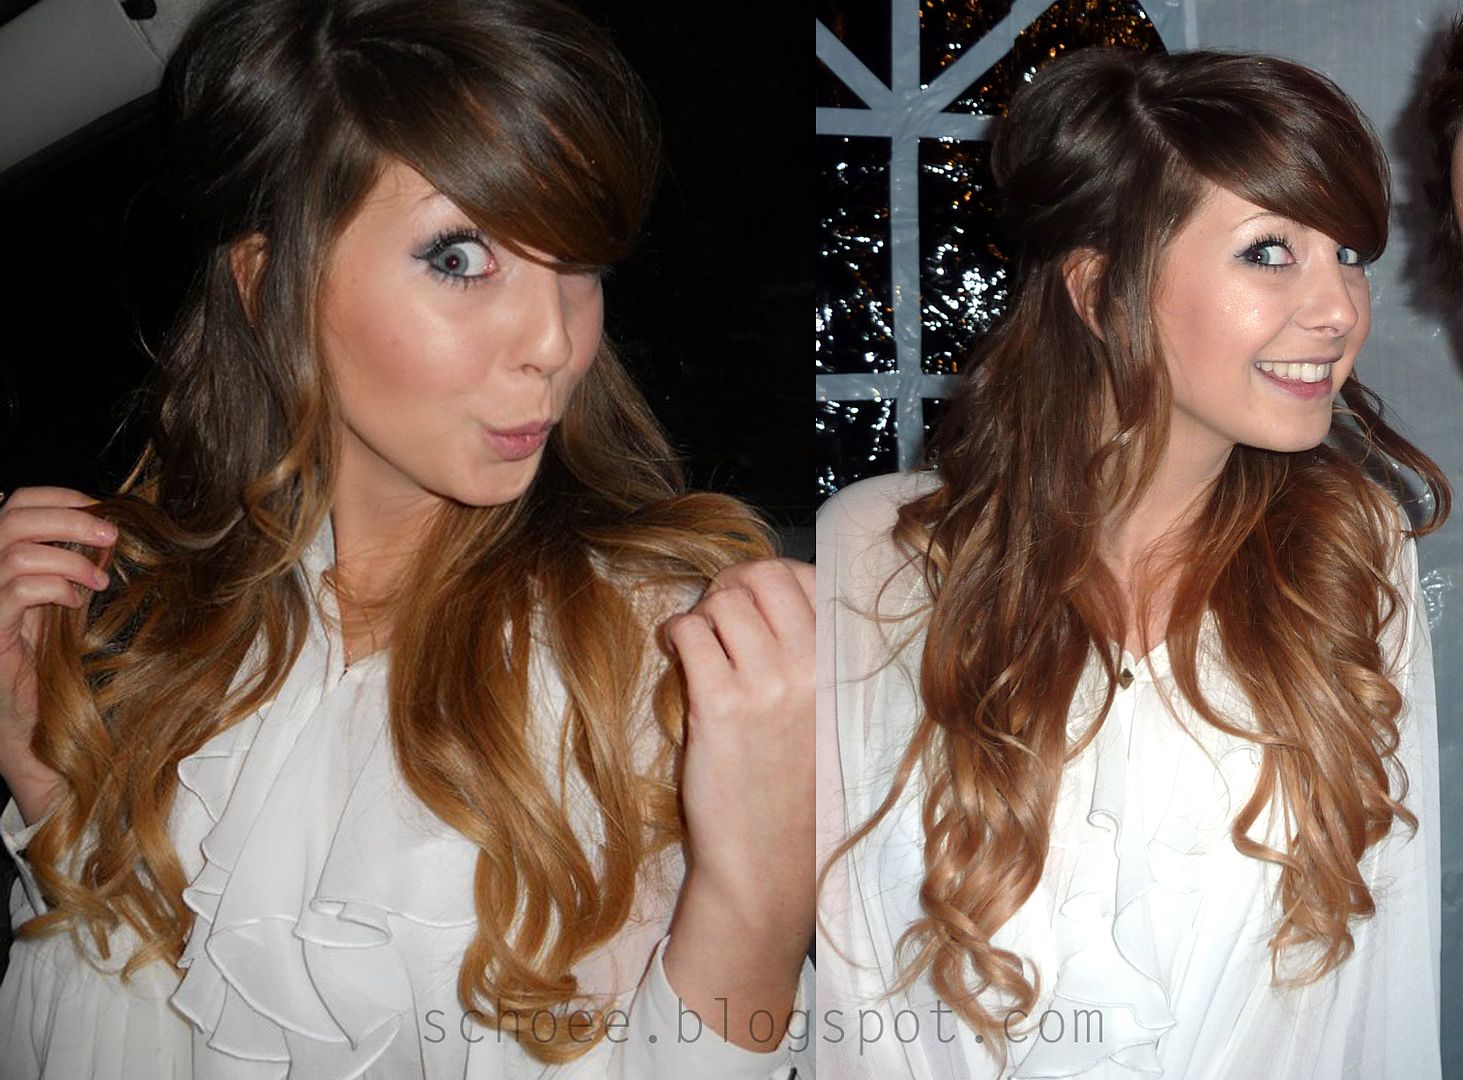
And this is the result. I do like it, considering i did it myself, it could have been a lot worse. I'm not planning on keeping it forever, it definitely fullfilled my longing to change my hair & i think it actually looks really nice. I have noticed it has dried out the ends of my hair pretty badly, which were already very dry anyway, unless it's just making it stand out more haha. Over all though, thumbs up for a bit of Ombre hair.


Pretty sure my friend won't be too impressed i used this picture, sorry darling! :)

Tuesday, September 21, 2010

Shop Zoella

As of late, it has become increasingly clear i have a lot of things i just do not use. Clothes and makeup mainly and the odd accessory/electrical item. I do love having a good Blogsale but there is so much hassle involved with a massive list of items for sale on one post, i find it can get a bit much scrolling through 50+ comments to see who got what.

So for this reason, i have decided to create my very own blog shop. Don't be fooled into thinking it's going to be an all singing, all dancing proper shopping website, it has all the same elements of this blog, but im hoping it will be so much easier to maintain and sort through. Also giving you all the option of searching for something you might want. Have no fear, it shall be very straight forward, i don't do complicated. I could have chucked it all on Ebay, but i like to give my blog readers a chance to grab it first, and Ebay is the devil for selling - I dont want to pay for more than one detailed photo thankyou very much.

The same rules will apply when asking to buy an item, just simply state your paypal email and your country. Which also brings me on to say it is Interntational :)

The posts will just be in MUCH smaller batches rather than the typical 20+ items, so makes life easier for the both of us in the long run.

Click the Shop Header Below to take you to the website, or the widget to the right (which some of you have already spotted, and for that, i praise you for being alert, loyal bloggers) Please go and follow & give the info a quick read before i start putting items up for sale.


There will definitely be something for everyone, i have way too much stuff which you need to take off my hands.

I would really appreciate if you could spread the word about the shop, obviously not all of you are always interested in my blogsales but it's worth a follow just to keep updated with any new items.

Thankyou fellow bloggies.

Sunday, September 12, 2010

Disaster Designs

Not too long ago, my mum was in Bournemouth staying with a friend and she came across a bag, of which she fell in love. Unfortunately, she saw the bag in a boutique shop window, and the shop was closed & she had to come home the same day. When she arrived home, we sat and tried to search for the bag, typing into Google the description of it. Soon enough we came across a few on Ebay, but none new or cheap. It was becoming increasingly apparent we wouldnt be able to find a site that stocked it. August 23rd was Mums birthday, and so i set about on a mission to track down the bag so she could have it as a surprise. Funnily enough, Amazon now stocked it.

The Company is called "Disaster Designs" and they have a handful of different ranges within it. This is the "Paper Planes" range (The cutest in my opinion). It is somewhat in the more pricey range, but nothing too extravagent, and totally worth it.
I just wanted to share with you how pretty some of the items were. Of course Mum got her bag, and also a cute Wash bag/Makeup bag too. (which im pretty sure i will be stealing). If you're looking for something utterly adorable (Passport Cover, Coin Purse, Weekend Bag, Compact Mirror...) I'd highly reccommend you give this comapny a little search on the interwebz (Or check stockists as it can be stocked in independent shops & Boutiques)


Paper Planes Washabag


Mummys Weekend Bag, Also Paper Planes

What do you think? Personally i think they are GORGEOUS and look so cute in her bedroom. I want so much stuff from this company.

Thursday, September 9, 2010

James Brown Scandalous Haircare

As far as shampoo and conditioner goes, I honestly don't like to spend too much money, something that cleans and conditions my hair is all i need. Of course i like to indulge in the more expensive ranges such as TIGI every once in a while but since i don't have coloured hair or mega dry frizzy hair i've never really felt the need to splash out too often. Because of this, i like to try as many lower end brands as possible and places like Boots and Superdrug are always having different promotions on their haircare.

I came across James Brown's Scandalous range around 7 months ago when he was giving some away with a magazine. I picked up the treatment and instantly fell in love with it. I have around three lower end (i say lower end, but i'd say its more middle of the road) shampoos and conditioners i would HIGHLY reccommend and this is definitely one of them.

The Shampoo & Conditioner smell amazing for a start. If any of you are familiar with the Thierry Mugler Angel perfume, it is very similar to that but obviously not as strong. It leaves my hair feeling squeaky clean and removes any build up which may cause greasiness or weigh the hair down. I think this is why it gives it so much volume. For those of you with thin hair, this could be an absolute godsend. I have very heavy, long, thick hair, and for any shampoo to actually LIFT the roots and give it a nice light swishy feeling (get where im coming from?) is almost a miracle. Shampoo also lathers fantastically, so for those who get no satisfaction from no lather or suds, fear not. The Conditioner is also fab, leaves my hair silky soft yet no weighing down and gives my hair a healthy shine.

Above is a picture of my newly washed and blowdryed hair (do excuse no makeup and me standing ever so glamourously in my bra, ehem) I also used some of the James Brown Scandalous Mousse before blowdrying...

Which then brings me nicely onto the mousse. By far the best i've used. If you are wanting to achieve a naturally voluminous barnet, it's just standard that you use a mousse before blowdrying. If you don't, this could well be where you are going wrong. I will always use mousse after washing my hair, it boosts the hair at the root but also just makes styling so much easier. I use a nice full palm of mousse but obviously it varies depending on how much hair you have. If you steer clear of mousse because you feel it leaves your hair sticky, you're applying too much. Mousse should never leave an icky feeling in your hair. It should feel weightless.

The next thing is the treatment, this is amazing if you are feeling like your hair needs a boost of shine and body, and basically a little treat. Just as simple as other treatments, work into the hair concentrating on the ends, and leave on for around 5-10 minutes then rinse. Smells amazing and makes my hair feel SO soft. Love it.

Last but not least, the hairspray. Besides it's amazing scent (as with all the products) this hairspray is designed to make you feel as though you don't actually have any hairspray on your head. I wouldn't say it's good for a rock hard freeze hold but i love it because when i've just freshly washed my hair, sometimes i hate the fact i spray on the hairspray and it instantly looks frizzy and a little "hard". Obviously if you have a certain style in mind, you'd be in need of something like that, but when you just want a natural flexible style to be held in place without it appearing as though you have a head of hairspray this is perfect! Especially for styling your fringe.

Basically i absolutely love James Browns Scandalous Volume range and i will be buying it until the day it dissapears from the shelves. There's currently/was very recently an offer in Superdrug 2 for £6 (I think, don't quote me) so if it's still running i highly reccommend you go and stock up on everything in this range and give it a go. You won't be dissapointed.

Wednesday, September 8, 2010

Illamasqua Prescison Ink

Being somewhat of an eyeliner junkie and always trying and testing any eyeliner on the market (be it gel, pencil or liquid) when I saw that Illamasqua had released this eyeliner, i knew i had to order it. At a whopping £16, it is officially the most expensive eyeliner i have ever owned, and i do think that the price is a little too steep. For an eyeliner, I don't think anyone should be paying any more than around the £12 mark, but that it just my opinion.

When i first recieved the eyeliner, after pulling it from the amazing packaging (Illamasqua is always spot on with their packaging) I noticed how sturdy the tip of the liner was, and that it came to a nice point. It reminded me a lot of my favourite drugstore liner, L'oreal Superliner, so i decided to compare, since the prices were oh so very different.

Both liners come to a nice point, but it's very clear to see that Illamasqua has the upper hand with a much more sturdy, and shorter tip, thus making application slightly easier for "prescsion lining". Having said that, I do like the L'oreal liner for it's flexibility, as it can make the application a little swifter and to some, easier but may not be as prescise.

L'oreal Superliner on the Left, Illamasqua Prescision Liner on the Right
The L'oreal Liner feathers slightly but you can still get a nice even, straight line, and it's nice and black. The Illamasqua liner, is a bit more shiney, which i like a lot, and doesnt feather into the skin. Although once applied to slightly uneven, wrinkled eyelids, it doesn't look so neat anyway so it doesnt make much difference unless you are using it on a very even surface.
I put water on the back of my hand and scrubbed the liners, the outcome is seen above on the right. Both claiming to be waterproof, it's pretty obvious which is the winner here. In some ways, i think it was a little unfair as i scrubbed less than 5 minutes after applying the liner to the back of my hand, but this just indicates that, even if L'oreal Superliner IS waterproof, it may need more drying time before any water comes into contact...and this just goes in Illamasquas favour for amazingly quick drying time and SUPER good staying power when water is sloshed on it.

I would reccommend this liner to those of you who are looking for something with amazing staying power. I did (unfortunately, and very disgustingly of me) fall asleep with my makeup on not too long ago, and when i awoke, my eyeliner was still perfect.
One thing i really don't like about it though, is that i can't smudge a pencil/khol liner over it to give it a smokey finish, which i do like doing with a lot of liquid liners as sometimes i feel the line is too harsh. When i attempt to add pencil and smudge, the liner just flakes off onto my face...and i'm left with gappy, weird liner which i then have to re-do. I think this could be due to the fast drying agent and the fact that it's so solid.

I think i will be using my L'oreal Superliner for smudging-ness and my Prescision Ink Liner for nights where my makeup needs to stay put no matter what.
Have you tried this liner? If so, what did you think?

Sunday, September 5, 2010

A place to stay in London when you're homeless?

The Hotel we stayed at was called the Kensington Town House Hotel or The Hogarth Hotel (it's former name), we didn't want anything with immense amount of luxury or more than £60 a night (which for central London was increasingly hard to come by) All we really wanted was a double bed, a tv, internet access and an ensuite (shared bathroom was definitely an absolute NO NO - call me a snob...) and somewhere close to a tube for quick access. Thankfully, this hotel ticked every box. It was quite small, but I thought this made it quite cute. The Earls Court Tube station is literally a minutes walk from the Hotel which does mean you can hear the trains, but honestly, it's not enough to distract you from sleeping or thinking or breathing... FYI - Hotel was booked through Laterooms.com. Think it worked out cheaper that way.


The bedroom & Ensuite
In terms of what's around the hotel, there is pretty much every fast food chain you need. Maccy D's, Burger King, KFC, Cornish Bakehouse...you could be spoilt for choice in terms of quick cheap food. We had planned to go out for a sophisticated meal, but we were just too lazy and skint, so ordering a Nando's takeaway and going back to hotel was a much better idea :)

On the Friday, I was left to wander around London with a small amount of money and an oyster card. I went to Covent Garden as it's one of my favourite places. The shopping isn't overlly great, but i just like walking around there as it's cute and there's never crowds of people that slow your walking pase to that of a snail (unlike Oxford Street - which i then went on to)


Covent Garden
Overall it was a really nice few days, made better by the fact we didn't have to stay in a dingy hostel, sharing a bathroom with Bill & Ben...phewph. I would reccommend the Hotel for those of you who want to spend a bit more to have a few luxuries like the ensuite, and the tv...obviously if none of that bothers you, i'd save your money and go for the Hostel.

Saturday, September 4, 2010

When one gets bored, she snips.


I got borded & snipped my fringe, I don't like when it becomes too long and unruly, and it becomes increasingly hard for me to style or actually like how i'd styled it. Don't get me wrong, sometimes i like having a long fringe, and parting my hair in the middle, but i got fed up with it and it was weighing it down, thus making my hair look more flat. So, here is my shorter fringe styled to the side (how i used to wear my hair everyday without fail) Have no fret those of you who think i suit a middle parting more, i can still part it, and actually, it looks better. More Mollie King-esq (Google if unsure) After taking these photos, i also realised i have natural highlights through my fringe. I did have highlights put in (about 7) around a year and a half ago, so they have pretty much gone, but yeh, why have i never noticed those before? I curled the ends of my hair on a low heat using my Cloud Nine straighteners (LOVE - Buy some. Now)

Also, for those who may be interested I am wearing Mac's Studio Fix Fluid on my face, with Bare Escentuals on top & Nars Orgasm blush. Nothing on my lips & Mac's Woodwinked & Bronze on my eyes with Maybelline False Lash effect mascara (very unsure of this mascara, sometimes it works like a dream, other times its too wet and clumpy and the brush is a beast - Thoughts?